infoSecur Documentation
infoSecur API and UI Setup Guide
We have three ways that you can connect and use infoSecur in your organization. Please review the documentation below.
Development Setup
Install GIT https://git-scm.com/download/win
Create github account and get access to following repositories:
– Backend API – https://github.com/info-via/InfoSecurApi.git
– Frontend UI – https://github.com/info-via/info-secur.git
– From your chosen directory
-
- run ‘git clone <git url from above>’ to initially pull down the code to your local development environment.
- Run ‘git pull’ to get updates pushed to the repository from other developers.
Install Node https://nodejs.org/en/download/
Install .NET Core 5.0 SDK https://dotnet.microsoft.com/download
Install Angular Using Command Line (npm install -g @angular/cli)
Install Sql Server Express 2019 https://www.microsoft.com/en-us/sql-server/sql-server-downloads
Run Locally On Laptop/Desktop
Database
- Enable SQL Server Authentication in SSMS for your database server
- Create Database and add login with sysadmin role. User should use SQL Server Authentication.
- Run MsSqlDDL.sql script found inside the Backend API git repository. The script assumes it is running in the context of the database just created.
API
Database Connection String
- Create System Environment Variable named “INFOSECUR_CONNECTION” and set the value to your ODBC connection string.
Example:- “Driver={ODBC Driver 17 for SQL Server};Server=MSI;Database=InfoSecure;UID=username;PWD=password;”
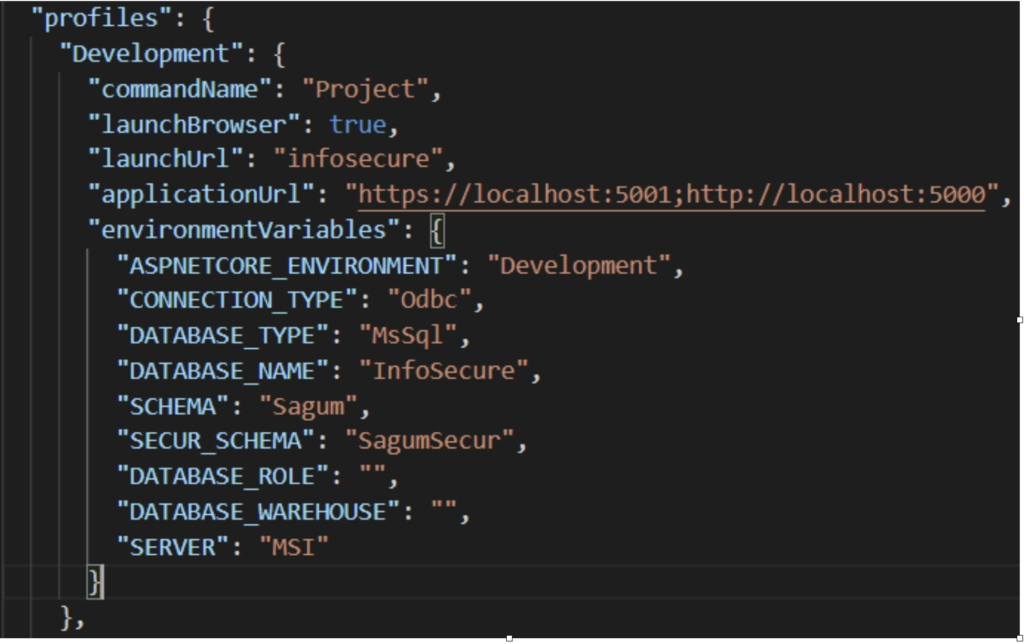
- Set DATABASE_TYPE to “MsSql”
-
- Update DATABASE_NAME, SCHEMA, SECUR_SCHEMA, and SERVER with correct values.
- DATABASE_ROLE and DATABASE_WAREHOUSE can be left blank.
 From the command line, in the application root directory, run:
-
- ‘dotnet run –launch-profile Development’
Front End UI
In the application root directory, run:
- ‘npm install’
- ‘ng serve’
- Browse to localhost:4200
Set Up Admin Role
- From the UI Home Page, click the “Register” button, and create a new user you will use to administer the app. This user will have rights to edit the impersonation tables and assign roles to new users.
- To give admin rights to this newly created user, run the final command against your database from the MsSqlDDL.sql script found in the InfoSecureApi code repository. Substitute <admin_username> with the username you just created. Example command for Sql Server:
INSERT INTO [SagumSecur].[SecurRegisteredUser_SecurRegisteredUserRole]
SELECT a.[ID], b.[ID] FROM [SagumSecur].[SecurRegisteredUser] a
FULL JOIN [SagumSecur].[SecurRegisteredUserRole] b on 1=1
WHERE a.Username = ‘my_user_name’ AND b.[Role] = ‘admin’
;
- You will need to logout and log back into the app for the admin rights to apply in the UI.
Deploy and Run On Local IIS
Front End UI
- Assuming the frontend and backend projects are within the same directory, edit the “outputPath” setting inside angular.json to be “../InfoSecureApi/wwwroot”

- From the command line, in the application root directory run:
- ‘ng build –prod’
- This will publish the front build to the “outputPath” we specified previously
- At this point you should also be able to run both backend and frontend from the API by running ‘dotnet run’ and navigate to localhost:5000
API
- From the command line, in the app root directory, run:
-
- ‘dotnet publish –configuration Release’
IIS
- Enable IIS on Windows 10:
-
- Control Panel > Windows Features > Internet Information Services
-
- Also enable Dynamic Content Compression under Internet Information Services > World Wide Web Services > Dynamic Content Compression
-
- Press OK
- Download Dotnet core hosting bundle 5.0
- Open IIS Manager
- Left Click ‘Default Web Site’
- Click on ‘Basic Settings’ on right hand side to view Physical path
- Copy and paste the published files from InfoSecureApi/bin/Release/netcoreapp5.0/publish/ to the physical path identified in the ‘Basic Settings’ from IIS.
- Edit the environment variables by left clicking the server (top left) > Open Configuration Editor > environmentVariables
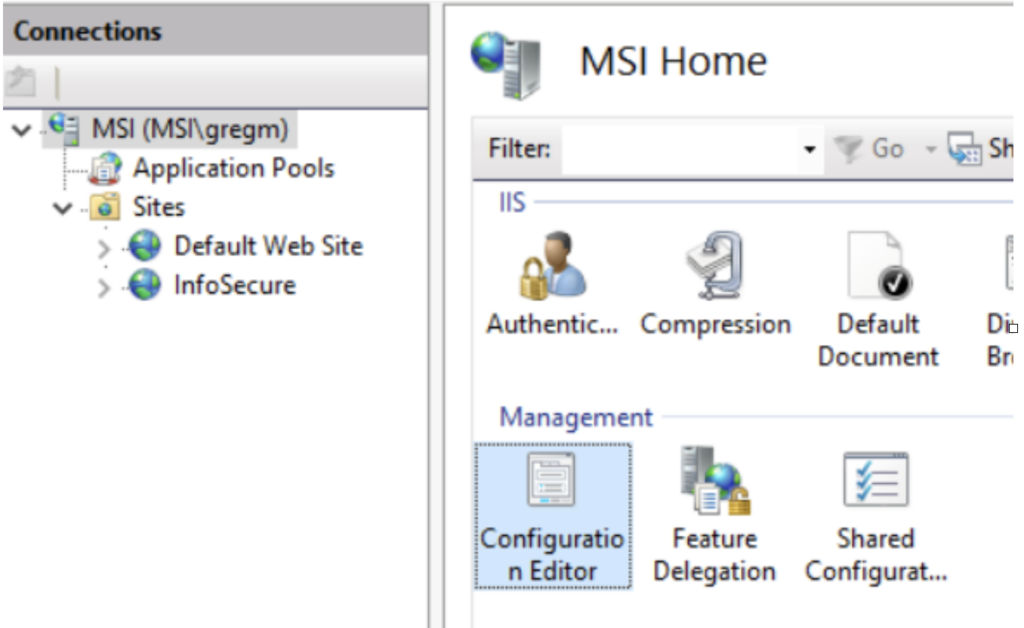
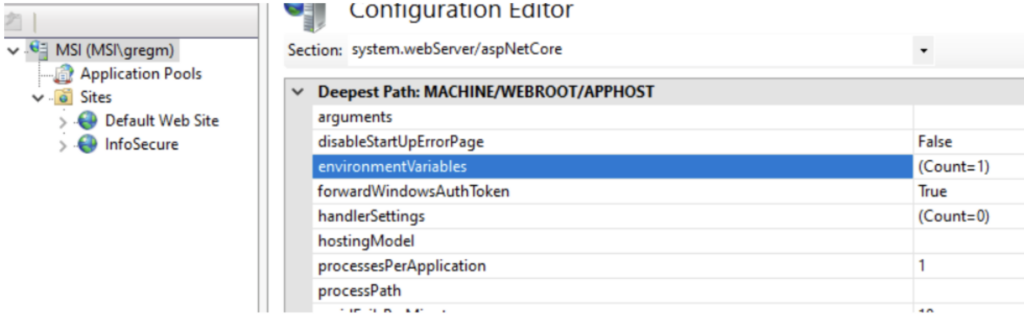
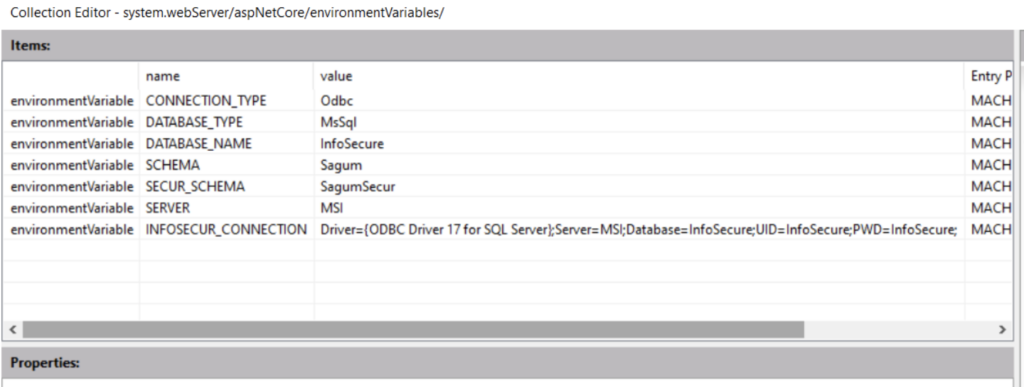
Set the following environment variables in IIS. To edit environment variables, Left click the server (top left) > Open Configuration Editor > environmentVariables
- “CONNECTION_TYPE”: “ODBC”
- “DATABASE_TYPE”: “MsSql”
- “DATABASE_NAME”: “<Your_Database_Name>”
- “SCHEMA”: “Sagum”
- “SECUR_SCHEMA”: “SagumSecur”
- “SERVER”: “<Your_Server>”
- “INFOSECUR_CONNECTION”: “<Your_Connection_String>”
The database names and schema names may differ from the values shown above.
- Restart the server and the website
- Browse
SSL
- In open powershell as Admin
- Create self signed cert
- New-SelfSignedCertificate -CertStoreLocation Cert:\LocalMachine\My -DnsName “localhost” -FriendlyName “LocalInfoSecurCert” -NotAfter (Get-Date).AddYears(1)
- Open certificate manager and install the newly created certificate as a trusted certificate
- In the IIS Manager
- Add new website
- Give it a name, select physical path
- Set binding to https
- Select newly created cert
- Browse to site
Need Support?
Our team is available to help support your setup, deployment and ongoing use of infoSecur.